
DIY Center Speaker Shelf and Back Light
for Toshiba 42H81 RPTV
Speaker is Cambridge Soundworks Center Channel Plus.
This is a relatively light weight speaker. Proceed at your own risk.
Care should be taken not to place too heavy a speaker on the TV cabinet.

Shelf constructed with 1/4" paneling and 1/4 round moulding.
Clear silicone chalk used to fill minor contour gaps and adhere
shelf to cabinet.
This is to provide added stability but still allow for future removability.
(I could
have been a just little neater with the chalk!)
TV screen can be removed for servicing with speaker and shelf in
place by
using long screw (nut) driver to reach the two screen screws under the shelf.
Backlight is Wal-mart 18" Under Cabinet flourescent fixture
with 15W "aquarium" bulb.
(Per suggestions from raghu13 and beckp at http://www.hometheaterspot.com Toshiba forum.)
Note: Do not buy the GE Aquarium and Plant bulb at Wal-mart. It is not the correct color temperature.
I am currently using a Philips F15T8-TL865 PLUS bulb that I
bought from a local commercial lighting distributor for $15.
This bulb is rated at 6500K with a CRI of 86, which is not quite as high as some other bulbs mentioned at Keohi Backlighting.
A large pet store or tropical fish store may also have an aquarium bulb that is rated at 6500K,
but beware of
the Coralife Spectramax bulb at PetSmart.
The in-store display and packaging say 6500K,
but the product apparently has been changed to a significantly different compostion.
Fixture painted flat black and power cord taped to blend in better with back of cabinet.
Backlit Screen Shots
(In response to requests.)
I did not take photographs during construction, but the process was straight forward and utilized material I happened
to have available. Many variations are possible and possibly better.
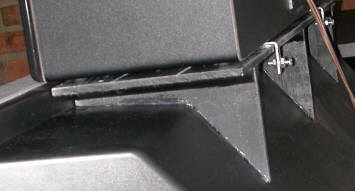
View showing support struts, alignment with top edge of cabinet, and hardware for mounting back light.
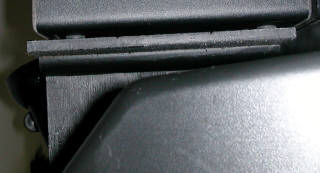
View showing moulding for afixing and supporting strut.
(One piece of quarter round on each side of each strut.)
Basically it is a matter of measuring and dimensioning the shelf to the speaker and top of the TV. I chose to make the top of the shelf Ievel with the top edge of the cabinet just behind the screen frame, so as to make the shelf an extension of that top edge. The idea was to make the shelf depth as shallow as possible without resting the speaker on the screen frame. There is actually a slight convex curve to the rear edge of the cabinet. I didn't realize this until after my shelf was put together, so while the fit is fine in the middle of the shelf, there are 1/8" gaps at either end. For a perfect fit the cabinet contour could be traced and the curve cut into the front edge of the shelf.
I decided to utilize three support struts. I traced the contour of the "shoulder" of the cabinet which I transferred to cardboard templates. The templates were trimmed to achieve a decent fit and a level support for the shelf before transferring them to the paneling material for cutting with a jig saw. (I used a level when adjusting the templates. Don't rely on the top of the screen frame for a guide as it is not actually level from front to rear.) The struts were then sanded to fine tune the fit with the contour of the cabinet. Since I'm not that great a carpenter, I eventually used chalk to fill the minor gaps.
The struts are glued to the shelf between two lengths of quarter round moulding that are tacked to the shelf to provide good vertical support. Because the back light was an afterthought it is supported by small angle irons screwed to the shelf. If I had envisioned the back light in the first place I could have positioned two of the support struts to line up with the mounting holes on the light, and hung the light from screws in the quarter round supports.
Updated: 12 August 2002
8017
![]()