|
|
This article is based on a liner made for a 1999 Jeep (WJ)
Grand Cherokee. The same techniques could be applied for any vehicle with a cargo area that utilizes folding seats.
|
|

|
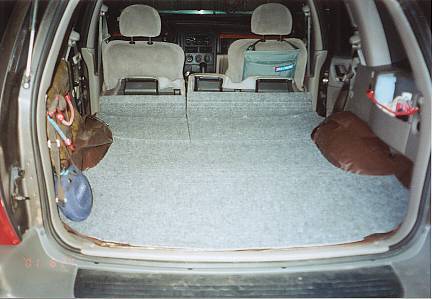
Since our dog often travels in our Jeep I wanted to protect the cargo area carpet and seat
backs from dirt and pet hair. I wanted the flexibility to allow the dog travel in either the rear cargo area, with
the seats up, or behind the front seats, with the rear seats folded. In previous vehicles I had used tarps and
old carpet to cover the floor, but when I purchased the latest Jeep I decided to buy a custom cargo liner.
Soon after acquiring the Jeep I paid the dealer over $110 for an official "Jeep" cargo liner. Unfortunately
the dog could never seem to get a good grip with her feet and would always be scrambling and scratching around
on the liner. This would become annoying after only a few minutes, so I had been looking for a better solution
for a long while.
I found that there are a variety of cargo liners on the market but they all seem to have drawbacks as far as I
was concerned. Some are too slick surfaced for the dog. Others don't protect the seat backs. And the best ones
aren't cheap at nearly $200US. So I never bought another prefabricated liner. But the DIY design I came up with
has worked out quite well, providing almost exactly the characeristics I was looking, and for a lot less money
than the alternatives. So I felt it was worthwhile sharing the idea in this manner. |
|
|
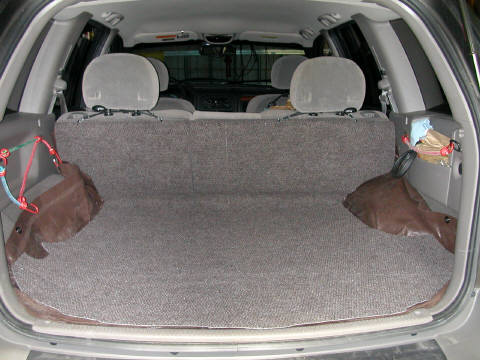
What I developed is a nice looking yet very economical solution that protects
the Jeep's cargo area from dirt and pet hair. Using some vinyl backed carpet runner, which can be purchased at
many hardware stores, plus a few other items - costing only about $25 in total - I was able to put together a custom
liner that:
- Looks nearly as nice as factory carpet.
- Protects the cargo floor and rear seatbacks from dirt and moisture.
- Folds up and down easily with either or both seats.
- Provides a surface that our dog travels quietly and comfortably on.
- Is easy to clean.
|
|
|
Tools
| Marker or Chalk |
| Utility Knife |
| Shears |
| Drill or Hole Punch |
| Tape Measure |
| Long Straight Edge |
| Carpenter's Square |
| Hack Saw |
| Masking Tape |
Estimated Construction Time
3 Hours
|
Materials
| Carpet Runner (~26" wide*) |
13
|
ft |
| 3/16" (x 36") Steel Rod - Zinc Plated |
2
|
|
| Duct Tape |
15
|
ft |
| Small "Zip" Ties |
7
|
|
| Velcro 1" adhesive backed "hook" side |
6
|
in |
1"x3" of thin flat plastic for velcro base
(cut from margarine tub lid) |
1
|
|
| Paper (for pattern) |
25
|
sqft |
| |
|
|
| Bungee Cord (2 Optional) |
|
|
| - Shock Cord |
3
|
ft |
| - "S" Hooks (Size 812) |
4
|
|
| - Washers (5/16") |
4
|
|
* The carpet runner may be found in slightly different widths. If so, the construction plan
can be adjusted accordingly.
|
|
Design Considerations
The fact that the cargo area can be changed by folding the seats introduces several design
considerations for the liner.
Adjustable length.
Since more of the seat back is exposed when it is folded forward, the liner needs to be
longer when the seats are down. This is handled by an extension flap (6" or longer) that folds down behind
the liner when the seats are upright.
|

Schematic Showing Variable Length Requirement
|
Liner Support with Seats Upright.
When the seats are up the liner must be held against the seat backs to protect them. This is accomplished using
a metal rod to provide a rigid framework which is hidden inside the top hinge of the liner.
The rod is supported by light weight bungee cords which wrap around the base of the head rests and are hooked to
the metal rod through holes in the liner.
Since the right-side seat is wider and its liner consequently heavier, double sided velcro is used to provide additional
support to the upper inside corner of the liner on that side. |
Side View of Liner Support with Seat Up
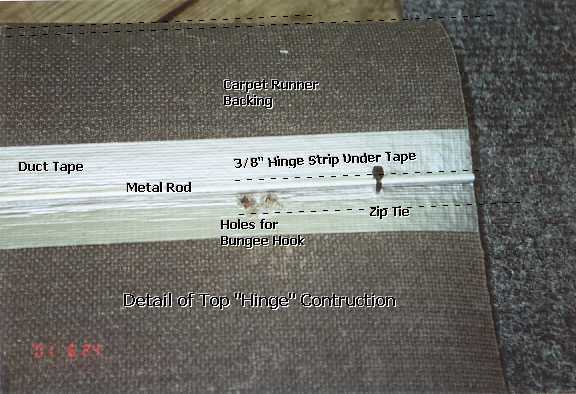
Closeup of Top Hinge Support
|
"Hinge" Flexibility. The liner requires two "hinges".
One at bottom of the seat back, which must flex about 90°. And one at the top of the seat back to accomodate
the extension flap. The top hinge must flex 180°.
To make the hinges more flexible they are "double-jointed". This is accomplished by using an additional
3/8" strip of material between the hinged sections. |
|
|
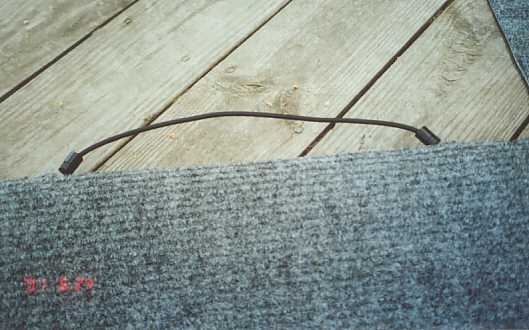
Folded Top Hinge with Bungee Attached
|
| |
|
Construction
Pattern
The first step is to make a pattern. Start by taping together some large sheets of paper
to form a section sizeable enough to cover the entire cargo area with the seats folded forward. Center the paper
in the cargo area and align it so it is parallel with the vechicle. Then tape the paper down so it does not shift
while you trace the outline of the cargo floor. Allow enough length at the front of the pattern to cover the folded
head rests and seat cushions.
Postion the pattern for about 1/2" of overlap at the sill of the cargo hatch. (You
can always trim off any excess from the liner later - but you won't be able to add any!) Using a piece of tape,
precisely mark the point in the center of the hatch sill where your pattern will start. You will refer to this
mark later on to verify the position of your bottom hinge, which is very important if the liner is to fit properly.
Trace the outline of the cargo floor on your paper.
Mark the following on the pattern:
- Position of the head rest support posts on both seats.
- Position of the split between the two seat back sections.
- Position of the joint between the folded seat backs and the rear cargo floor (mark on both
left and right edges of the pattern)
- Position of cargo tie-downs.
Then remove the pattern and fold the seatbacks upright.
- Measure the distance from the mark you made at the rear of the cargo area to the seat backs.
(Measurement A)
Transfer this measurement to the center of your pattern and compare it to the marks you
made at the edges. They should be in a straight line. Now you should move the actual
location of the bottom hinge/seam on the pattern rearward about 1/4" to 1/2" to allow room for the liner
to fold. If the hinge is too far forward the liner will be pushed back when you
fold up the seats. Mark the adjusted hinge location on the pattern.
Note: Be sure to adjust
Measurement A by this same amount for use in later steps.
- Next, measure the height of the seat backs from the floor to the top of the seat. (Measurement B)
Add this distance to the first measurement (A + B = C) and mark the location of the top hinge at this distance from the back of edge of the pattern.
The top hinge location will be six inches to a foot or more from the front edge of the pattern,
depending on the width of the carpet runner you purchased and how much material is available to cover the folded
seat cushions. This front portion of the liner will be the extension flap that is folded over when the seats are
upright.
- Finally, using a scissors, carefully cut out the pattern outline.
|
|
Assemble Carpet Runner Sections
Find a flat work area where you can use your utility knife without damaging the blade or
the surface under it. Square off the ends of the runner, which were probably cut unevenly at the hardware store.
Cut the 13 feet of carpet runner into three sections; approximately 57", 54", and 45".The runner
is easiest to cut cleanly when it is face up. Make sure each cut is square.
I chose to have one of the section seams correspond with the location of the bottom seat
back hinge, so I cut the width of the shorter (45") piece of runner from 26" down to 17 1/2" . See
the Section Layout illustration below to see how this
works.
(You might choose to do this differently if you want to make a longer liner
from the same amount of material. But the drawback to that approach is that there will be a seam in the middle
of the seat back section, between the two hinges, making this section less rigid, and possibly more difficult to
keep flat against the seat backs when upright.)
Following my method, use a straight edge and utility knife to cut off a strip measuring:
Measurement A - Runner Width
Cut the strip along the length of the shorter section of runner. Be very careful to make
a straight clean cut. Otherwise you will not have a clean seam when you tape the pieces together.
Now when this narrower section is joined with a full width section it will be equal to Measurement
A.
|
Note: If you are using carpet runner with a width other than 26" you
will have to vary the layout somewhat. The key would be to start with your pattern and then carefully determine
what the best way will be to cover that area with the runner of the size you actually have.
Location of Cut for Bottom Hinge Seam
on Smallest Section of Runner
|
|
Bottom Hinge
The hinges are "double-jointed" to improve flexibility. This is achieved by having
two hinge "cuts" that are separated by a 3/8" strip of liner material. You already have one cut
(i.e., the seam) in place for the lower hinge.
For the second cut - from the back side of the smaller of the two sections of runner that
you plan to join to form the hinge seam, cut a slit 3/8" from the edge. If possible, cut only about 3/4 of
the way through the runner. Preferably you do not
want to cut all the way through, as by leaving some intact carpet fiber you will provide a stronger, but still
flexible, support for the hinge. The remainder of the hinge support will be provided by duct tape on the back side.
Joining Runner Sections. Place the three sections
face down as illustrated and, holding them tightly together, tape them with duct tape. You will want the seams
as tight as possible, for better appearance and to keep out dirt, so you should have an assistant hold each seam
tightly together while you "tack" it with several short pieces of tape. This will hold the seam tight
while you bind the entire length with duct tape. Finally, use the remaining roll of tape as a "roller"
to press the tape firmly over the seams.
|
Section Layout
|
Transfer the Pattern
and Cut Out the Liner
Flip the assembled carpet runner right side up and lay the pattern on top of it. Be sure
that you also have the pattern right side up and that it is correctly oriented relative to the location of the
bottom hinge seam (i.e., the widest section of runner should be at the rear of the pattern, and the bottom hinge
seam should be toward the front of the pattern).
Tape the pattern down to the carpet so it does not shift and then trace around the edge
with a marker. Be sure to mark the location of the top and bottom hinges, the seat back split, and the tie-downs.
Place marks for the bungee hook holes along the top hinge about 3 to 4 inches outside of the head rest support
locations.
Then carefully cut out the liner with your utility knife. You can finish up any rough edges
or corners with a shears or sharp scissors.
Next cut out the seat back split from the front of the liner to the lower hinge. Drill or punch a 3/8" hole
at the lower hinge end of the split. This is to provide a strain relief to prevent the split from continuing into
the floor portion of the liner. Form the split with two cuts approximately 1/8" apart, so that the two sections
do not interfere with each other when only one seat is folded down.
|
Bottom of Liner Showing Seams and Hinges
|
Top Hinge
At the top hinge location mark (or dimension "C" as measured from the rear edge
of the liner) draw a line across the liner backing. Mark the location of the two hinge cuts 3/8" apart, straddling
the hinge line. Then, using a utility knife and straight edge, cut the hinge slits - but again only through the
backing, so as to preserve some carpet fiber to reinforce the hinge. Complete the hinge with duct tape applied
along its length.
|
|
|
Seatback Section Support
Mounting the Support Rods
Carefully punch or drill holes for the bungee hooks at the four points you previously marked
along the top hinge. Two 3/8" inch holes touching each other to form a figure "8" should provide
a large enough hole for each bungee hook.
Using a hack saw, cut the two lengths of steel rod so they are just slighty shorter than
the width of each of the two seat back sections. Then punch or drill holes for the small zip ties to secure the
rods to the bottom side of the top hinge. Use 3 ties for the narrow side and four for the wider side.
|
|
|
Finished Top Hinge with Support Rod Installed
|
|
Assemble the Velcro Strip
Cut the 1" adhesive backed velcro "hook" material strip into two slightly
unequal pieces. Stick the velcro to opposite sides of a thin piece of plastic that you can cut from a margarine
tub lid or other source. The side with the larger piece of velcro will mount on the upper inside corner of the
larger seat back. The side with the smaller piece will grab onto the folded liner when that seat is upright. Having
slightly more velcro on the seat back side will allow you to detach the liner from the velcro while still keeping
the double-sided velcro attached to the seat.
|
|
DIY Lightweight Bungees
The bungee cords to hold up the liner should be about 12"-13" long and must have
relatively small hooks to fit through the liner and around the steel rod.
If you are unable to purchase suitable bungees you can make some from elastic shock cord
(available where rock climbing equipment is sold) or less expensive light weight nylon rope with adjustable hooks,
made from "S" hooks, with one end bent closed, and fastened with a washer as illustrated. Allow about
16" of cord to form a 12" bungee with hooks.
|
|
Tie-Down Cut-Outs (Optional)
If you plan to use the tie-downs on the floor of your vehicle, you can cut out flaps at
the tie-down locations you marked earlier. These can be rectangular or "D" shaped with only three of
the four sides cut, so as to form a flap which can be closed when not using the tie-downs.
Installation and Operation
Hopefully, this should be self explanatory after constructing the liner. But please feel
free to email the author at the address below if you have any questions.
|
|
|
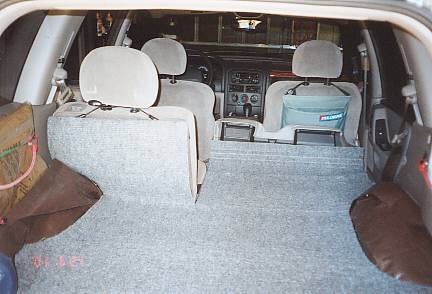
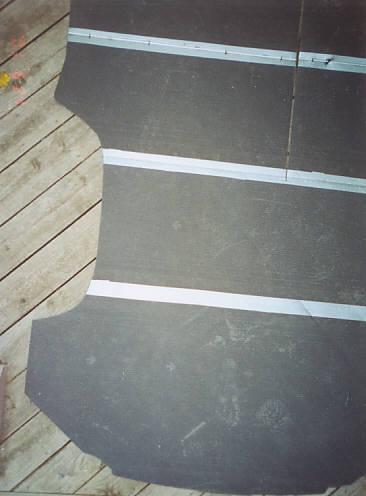
Note that the photos show an inexpensive 6' x 8' plastic
tarp under the cargo liner. The tarp provides additional protection for the sides of the cargo area. The liner
was actually developed because a tarp alone is not an optimum solution, being too slick to transport a dog comfortably,
and of course a tarp does not look nearly as nice as the fitted carpet runner liner.
|
Mark II - Design Revisions
After approximately one year of service with the above design, the weak link revealed itself,
namely the use of duct tape for the lower hinge joint. This tape gradually separated due to the repeated fore-aft
and up-down stress on the hinge. Use of carpet tape instead of duct tape might have resulted in a stronger seam.
In any event, I experimented with re-taping the hinge, but the build up of old tape adhesive prevented a strong
bond, and when I attempted to remove the old adhesive with a solvent I inadvertently dissolved the backing of the
runner and ruined the liner. This led to the Mark II
redesign. |
Mark II Liner with Fore-aft Seam
This second liner was assembled from two pieces of runner with one seam running down the middle
of the cargo area from front to rear. I used double-sided carpet tape with duct tape over that. The advantages
of the fore-aft seam are that there is very little stress on the seam and the assembly is much simpler. The disadvantage
is that runner I used from Home Depot is 26 inches wide and two pieces are not quite wide enough to cover the entire
floor of the Grand Cheokee at it's widest points. C'est la vie. Either approach will work and each has it's tradeoffs.
I also made an improvement to the bungee hook system, using medium sized wire ("zip") ties as attachment
loops around the metal support rods. This approach results in a neater appearance and it also eliminates any potential
problem that might result from having the ends of the hooks protruding into the cargo area. |

Mark II Bungee Hook Detail
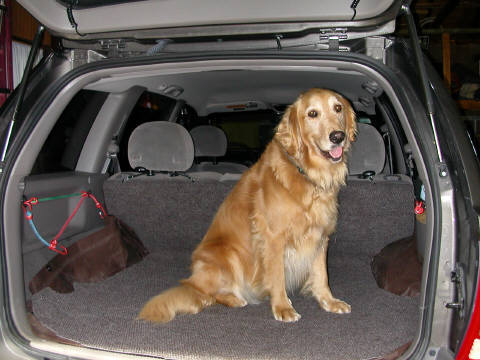
Either Version is Fine by Her
|
On Printing this Page
Since this page was designed with light lettering on a dark background
the following is suggested to facilitate printing:
Netscape Communicator 4.x:
Before printing - click File, Page
Setup, check Black text, (leave
Print backgrounds unchecked)
Internet Explorer 6.x, Netscape 6.x, 7.x: No special settings required.
|
|
Questions: pennhaven@twmi.rr.com
©2001, 2002 OptiProcess, LLC - All rights reserved.
Last Revised: July 7, 2002
|